Creating a Custom Hyperliquid Dashboard: Track Live Holdings in React

7th July 2025

26 min read


7th July 2025

26 min read

As the demand for decentralized derivatives exchange grows, platforms like Hyperliquid are becoming the go-to for real-time perpetual trading. If you're building a Web3 frontend or crypto portfolio tracker, showing live token holdings directly from Hyperliquid can dramatically improve your user experience.
In this guide, we'll walk you through building a custom Hyperliquid trading dashboard in React. You'll learn how to fetch and display a user's real-time balances using a clean component-based architecture.
Hyperliquid is a high-performance, decentralized perpetual exchange offering instant finality, low fees, and composable APIs. As a trader, you can access dozens of markets with lightning-fast performance. As a developer, you can use their APIs to build dashboards, bots, and analytics tools.
By integrating Hyperliquid data, you can:
Provide wallet-based trading interfaces
Also, Check | How to Fetch Token Pricing with On-Chain Bonding Curves
Prerequisites
Before you start building the dashboard, ensure you have the following ready:
Tailwind CSS or your preferred styling library (optional)
First, let's set up your React app if you haven't done so already:
We'll use Vite for lightning-fast development:
# 1. Create your Vite + React project
npm create vite@latest hyperliquid-dashboard -- --template react

# 2. Navigate into the project folder
cd hyperliquid-dashboard

# 3. Install dependencies
npm install

# 4. Start the dev server
npm run dev
Now, install any required packages:
npm install wagmi viem @tanstack/react-query @rainbow-me/rainbowkit
NOTE: Now, you'll need to set up a wallet connection using wagmi. You can follow the Wagmi Quick Start Guide for configuring your wallet connection.
Also, Explore | Build a Crypto Payment Gateway Using Solana Pay and React
Let's start with the custom hook to get holdings from the Hyperliquid testnet API.
// components/useHyperLiquidHoldings.jsx

import { useEffect, useState } from "react";
import { useAccount } from "wagmi";

export const useHyperliquidHoldings = () => {
  const [holdings, setHoldings] = useState(null);
  const [loading, setLoading] = useState(false);
  const { address } = useAccount();
  useEffect(() => {
    if (!address) {
      setHoldings(null);
      setLoading(false);
      return;
    }
    const fetchHoldings = async () => {
      setLoading(true);
      try {
        const response = await fetch("https://api.hyperliquid-testnet.xyz/info", {
          method: "POST",
          headers: {
            "Content-Type": "application/json",
          },
          body: JSON.stringify({
            type: "spotClearinghouseState",
            user: address, //for testing use can use the any address like zero address 0x0000000000000000000000000000000000000000
          }),
        });
        const data = await response.json();
        setHoldings(data);
      } catch (error) {
        console.error("Error fetching holdings:", error);
      } finally {
        setLoading(false);
      }
    };
    fetchHoldings();
  }, [address]);
  return { holdings, loading };
};
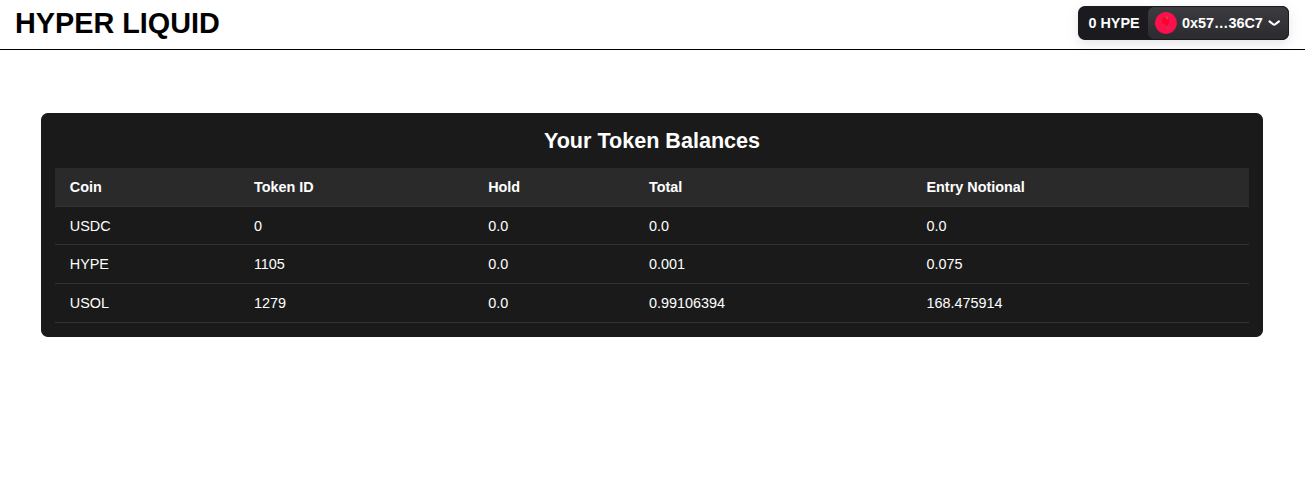
Next, build a responsive table UI to display the balances.
// components/HoldingTable.jsx

export default function HoldingsTable({ balances }) {
  return (

      Your Token Balances


              Coin
              Token ID
              Hold
              Total
              Entry Notional


            {!balances || balances.length === 0 ? (


                  No balances available.


            ) : (
              balances.map((item, i) => (

                  {item.coin}
                  {item.token}
                  {item.hold}
                  {item.total}
                  {item.entryNtl}

              ))
            )}


  );
}
Also, Discover | Create DeFi Index Fund with Custom ERC-4626 Tokenized Vaults
Add a simple navbar component for reusable top navigation.
// components/Navbar.jsx
import { ConnectButton } from "@rainbow-me/rainbowkit";
import React from "react";
function Navbar() {
return (
HYPER LIQUID
If you're planning to expand later (like wallet integration), create a Providers wrapper.
// components/Provider.jsx

import { WagmiProvider } from "wagmi";
import {
  RainbowKitProvider,
  darkTheme,
  getDefaultConfig,
} from "@rainbow-me/rainbowkit";
import "@rainbow-me/rainbowkit/styles.css";
import { QueryClient, QueryClientProvider } from "@tanstack/react-query";

const hyperLiquidChain = {
  id: 998,
  name: "Hyper Liquid",
  nativeCurrency: { name: "Hyper Liquid", symbol: "HYPE", decimals: 18 },
  rpcUrls: {
    default: { http: ["https://rpc.hyperliquid-testnet.xyz/evm"] },
  },
};

const config = getDefaultConfig({
  chains: [hyperLiquidChain],
  projectId: "3c81036dac8bb5451ee3e10fd92ea0e0",
});

const queryClient = new QueryClient();

function Providers({ children }) {
  return (


          {children}


  );
}
export default Providers;
Also, Check | Decentralized Prediction Market Development on Ethereum
Here's how your main app logic comes together:
// App.jsx
import HoldingsTable from "./components/HoldingTable";
import Navbar from "./components/Navbar";
import { useHyperliquidHoldings } from "./components/useHyperLiquidHoldings";
function App() {
const { holdings } = useHyperliquidHoldings();
return (
And entry point:
// main.jsx
import { StrictMode } from "react";
import { createRoot } from "react-dom/client";
import "./index.css";
import App from "./App.jsx";
import Providers from "./components/Provider.jsx";

createRoot(document.getElementById("root")).render(


);
* {
  margin: 0;
  padding: 0;
  box-sizing: border-box;
  font-family: sans-serif;
}

.navbar {
  width: 100%;
  padding: 10px 20px;
  border: 1px solid black;
  display: flex;
  align-items: center;
  justify-content: space-between;
}

.holding-section {
  padding: 50px;
}

.table-container {
  padding: 1rem;
  background-color: #1a1a1a;
  color: #fff;
  border-radius: 8px;
  margin-top: 20px;
  max-width: 100%;
  overflow-x: auto;
}

.table-title {
  font-size: 1.5rem;
  font-weight: 600;
  margin-bottom: 1rem;
  text-align: center;
}

.table-wrapper {
  overflow-x: auto;
}

.responsive-table {
  width: 100%;
  border-collapse: collapse;
  min-width: 600px;
}

.responsive-table th,
.responsive-table td {
  padding: 12px 16px;
  text-align: left;
  border-bottom: 1px solid #333;
}

.responsive-table th {
  background-color: #2a2a2a;
  font-weight: 600;
}

.responsive-table tr:hover {
  background-color: #333;
}

.no-data {
  text-align: center;
  color: #ccc;
  padding: 1rem;
}
Make sure to:
You've just built a functi onal Hyperliquid dashboard that fetches and displays live wallet holdings. With this foundation, you can extend your app to support:
Historical analytics
This kind of integration gives you powerful insights into decentralized trading activities and is a stepping stone toward building full-featured Web3 trading interfaces.

If you are planning to build a deFi protocol or deFi exchange like Hyperliquid, connect with our skilled blockchain developers to get started.
